Due to the scamming and hacking on Facebook, it is so important to make your account more secure. For making your Facebook account secure, you need to check your privacy and security settings. We all like to spend most of our time on Facebook, but nowadays we refuse to do it because lots of scams happen on Facebook. If you don’t know how to make your account secure, Read this article, This will definitely help you. After securing your account make sure, you secure your Facebook photos as well. If there is no privacy in your photos, anyone can misuse it. So,
Here are the steps to make your Facebook photos private:
How to keep your Facebook photos private:
When you post your photos on Facebook, you can choose who can see it. and later if you don’t want to share with anyone you can make it totally private. To do this,
– Go to your Facebook page.
– Upload your photo. While uploading, decide with whom you want to share your photo.
Who should see your post:
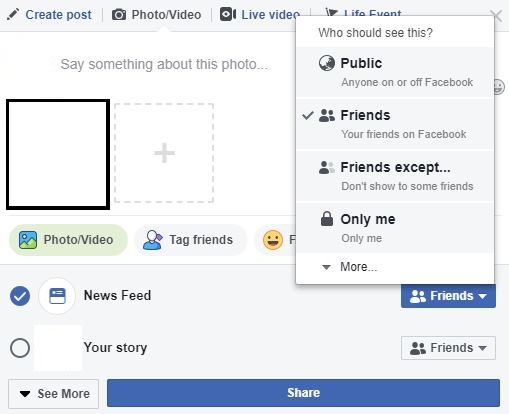
Public: If you set your privacy as “Public”, Everyone on Facebook will able to see your photos.
Friends: If you choose ” Friends”, only your Facebook friends will able to see your photos.
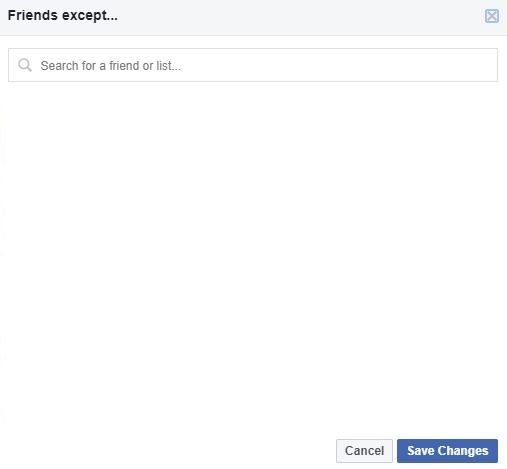
Friends Except: In this category, you can share your photos with all friends except only those you don’t want to share. If you want to share your photos except for some people, you just need to select that person name, then click on Save changes.
Only Me: If you don’t want to share your photos with anybody, you can choose this option.
In this way, you can choose with whom you want to share your photos.
Making your previously published photos private:
What about the previous photos that you already uploaded on Facebook? Don’t think so much, On Facebook, you can change the privacy setting for your previous photos as well. For this
– Go to your Facebook account,
– Then go to your profile. Find that photo on your wall, which you want to change the privacy settings.
– After that, click on Edit Post. Now you will see the pop-up box with information about that photo/album.
– Then at the bottom of the pop-up box, you will see the privacy icon.
– Click on that icon and select your privacy setting as you want.
– Then click on save.
Now you can change your previously uploaded photos setting.